Monday, February 25, 2013
Friday, February 15, 2013
Pointing the WebI Report to Prod system after migrating from Dev
After migrating the WebI report from BWD (or even BWQ) to BWP, you will get this error if you try to run the report:
“A database error occurred. The database error text is: The SAP SSO authentication process will fail because the current user doesn’t have an alias that matches system BWDCLNT… (WIS 10901)”
Fig 1 - Database error when running a WebI Report It is time to point this report to the BWP universe as it is still pointing to BWD. Follow these steps.
My environment:
SAP BW 7.01
SAP BusinessObjects XI 3.1 (WebI)
Webi Report built on top of a Universe which is on top of a BEx query
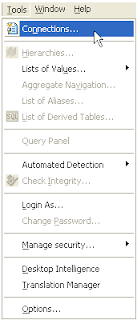
- Open your Universe Designer and from the Tools menu, select Connections
Fig 2 – Universe Designer Tools option
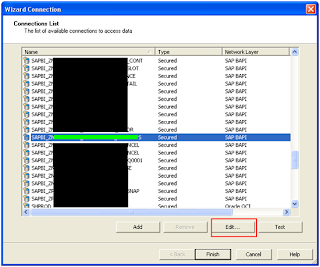
2. Select your connection from the list and then click Edit
Fig 3 - Wizard Connection - Connection List
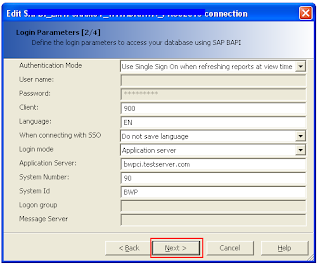
3. This will open up the Edit Connections, here you will have to change the connections parameters
Fig 4-1 - Edit Connections - Login Parameters [2-4]
4. The changed parameters should reflect BWP info and then click Next
6. On the next screen, just click Finish
Fig 4-2 - Edit Connection - Login Parameters [2-4]
5. On the next screen, select the universe that your WebI report should be pointing to
Fig 5 - Edit Connection - Catalog-Database Parameters [3-4]
Fig 6 - Edit Connections - Configuration Parameter [4-4]
7. You will come back to the Connection Wizard, here highlight the Connection and then click Test
Fig 7 - Connections Test
You should get this confirmation
Fig 8 - Connections Test Confirmation
8. Now click Finish
Fig 9 - Connection Wizard Finish
Now logon to InfoView and run the report, the report should run fine.
Please comment/correct any thing in here
************
***********
**********
*********
********
*******
******
*****
****
***
**
*
Subscribe to:
Posts (Atom)


