Today I received this email from Internet security group with this link. So I thought I should put this on my blog as well. Hopefully someone will benefit.
STORY HIGHLIGHTS
• Bob Greene gets an urgent e-mail from an old friend writing, "With tears in my eyes ... "
• The desperate plea for money turns out to be an e-mail scam
• Greene says malware placed on computers when a user clicks on a link can capture keystrokes
• Thieves take over e-mail accounts and seek money from contacts in the address book
For the full story, click the link below:
The 'With tears in my eyes' e-mail
This blog wil be updated almost daily and the topics will be dealing with the daily support of SAP BusinessObjects BI support. So check back daily!
![]()
Wednesday, March 31, 2010
Monday, March 22, 2010
Using Import Wizard in BO XI R2 -- Part 2
Continued >>>>>>> from Using Import Wizard in BO XI R2 -- Part 1


Here, select “Move to” and then highlight on the original folder “Reports Home” and then click OK.


I hope this was helpful and please comment and correct any mistakes.

FIG 6 - Import Wizard – Screen 5
Just click Next on this screen, as this is just a notification in case you have chosen to import Universes.

FIG 7 - Import Wizard – Screen 6
Click Next on this after choosing the default options.

FIG 8 - Import Wizard – Screen 7
This again is a notification window if one was importing the object “Rights”. Just click Next

FIG 9 - Import Wizard – Screen 8
Select reports required to import and click Next

FIG 10 - Import Wizard – Screen 9
For my example, I did not check option on this screen, and clicked Next

FIG 11 - Import Wizard – Screen 10
This screen again is a notification screen, click Next

FIG 12 - Import Wizard – Screen 11
This screen is displayed just before the reports are imported. Here you should make sure that the number of objects selected are same you have actually done in screen 9. Click Next.

FIG 13 - Import Wizard – Screen 12
This screen again shows the progress and the number of reports that are migrated. Here you can also view the logs. Then click done and then click Finish.
4) Now once this task is completed, you should logon to the destination CMC and check if the reports have been migrated or not.

Fig 14 – Reports being migrated
5) One thing to note is to verify if the reports are being migrated to same folder to a different folder. If it is the same folder, then another copy of the report folder is created and subscript (2) is attached. In any case, you will have to go to the

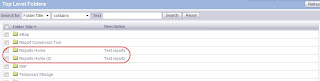
Fig 15 - Duplicate folder created after migration
In this we will need to move these reports from “Reports Home (2)” to “Reports Home”. Before this make sure you re-name the original reports in “Reports Home” as “Old – Crystal Report 1”, “Old – Crystal Report 2” and “Old – Crystal Report 3” since one will need this to check some other information (like database info, Scheduling info, Notification … etc) before they are finally deleted.
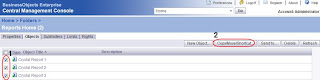
This is a sure way of not doing any mistake before deleting any reports from production. So you will go to this path: Home > Folders > Reports Home (2) and check the reports, and then click on Copy/Move/Shortcut.

Fig 16 - Moving the reports
Here, select “Move to” and then highlight on the original folder “Reports Home” and then click OK.

Fig 17 – Moving the reports to original folder
Now the reports will be in the original folder.

Fig 18 - Reports now in the home folder
One can conveniently delete “Reports Home (2)” now.
I hope this was helpful and please comment and correct any mistakes.
Tuesday, March 16, 2010
Correct path to navigate to the BOBJ Installation files on SAP Marketplace
These are the steps to SAP Marketplace to download the installation files from service.sap.com. I have put these steps together in my blog as this might help somebody.
First point to service.sap.com and click on SAP Support Portal link


First point to service.sap.com and click on SAP Support Portal link

Fig 01- SAP Support Portal link
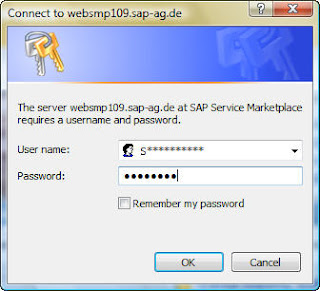
It will prompt you to login. Login with your s* credentials. It will prompt twice so make sure you put a check mark on Remember my password

Fig 02 – Login Prompt
You will come to this screen

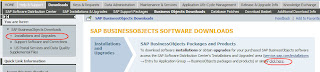
Fig 03 – Download -> BOBJ Download
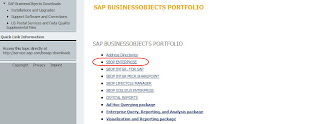
Click on Download and the click on Business Objects Download. On this page, click on one of these links (Installation and Upgrades) to get to the right downloadable files for BusinessObjects Enterprise 3.1, the latest version.

Fig 04 – BOBJ software download page
Next, click on SBOP Enterprise link. You might not see the same option you see in this figure given below here as that depends on the level of access as an Admin we have.

Fig 05 – SBOP Enterprise link
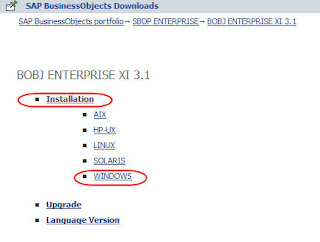
Now click on the latest version, or any version one desires

Fig 06 – Latest version BOBJ Enterprise XI 3.1
On the next screen, choose Installation if you are not upgrading and then click on Windows if not any other OS.

Fig 07 – Choose Installation and platform
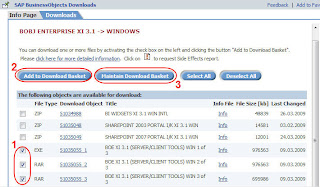
This will take you to the main installation files downloading area. Here you select the appropriate files, Click Add to Download Basket to add the selected filed to the download basket and then click Maintain Download Basket, from here you will download these files to your server or client workstation.

Fig 08 – Download steps to Download Basket
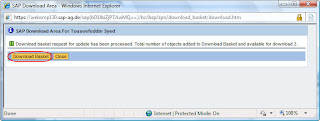
Once you click on Maintain Download Basket, you will come to this screen and here click on Download Basket

Fig 09 – Download Basket area
On the next screen, you can click on individual links to start the download. It is a good idea to get Download Manager and you can initiate multiple download at the same time.

Fig 10 – Download Manager
I hope this will help somebody
Sunday, March 7, 2010
Tracing CMS Mood!!
CMS (Central Management Server) sometimes shows that it is up in CCM (Central Configuration Management) but in CMC (Central Management Console) it shows that it is down. Not necessarily a consistent behaviour.

1 Stop CMS
2 Append –trace at the end of the string in Command in Properties tab
4 Now go to the location: Program Files\Business Objects\BusinessObjects Enterprise 11.5\Logging
and check the logs in the Logging folder.

Steps:
1 Stop the CMS
2 Locate file BO_trace.ini at this location C:\Program Files\Business Objects\BusinessObjects
Enterprise 12.0\Logging\logConfig
Note: A sample BO_trace.ini file can be found in the following locations after installing a build:
C:\Program Files\Business Objects\BusinessObjects Enterprise 12.0\Logging\logConfig\BO_trace.ini
To turn on tracing using the BO_trace.ini file, the "active" setting within the file must be set to "true" (i.e. active=true). And append -traceinipath to any server command line
Note: By default all the log files will be placed in \BusinessObjects Enterprise 12.0\logging folder
I hope this will be helpful to somebody.

Fig 01 – CMS Legend
As one would normally do, I re-started the CMS in CMC and thought I was done. It worked well for a day or two, but I found that it was down again in CMC while it was showing as up in CCM on the BusinessObjects Production server. I repeated the same process and after few days, this problem occurred again.
So to resolve this, I had to turn on the trace. I will not be going in details of what the errors were and how I fixed them. My intention is to write about on how to turn on the trace which is a great feature and will help in solving many apparently unsolvable problems. So to turn on the CMS trace and capture the logs. I am presenting 2 ways for 2 different versions BO XI R2 and BO XI 3.0 and up.
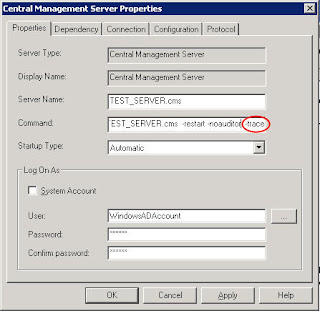
BO XI R2: Append –trace in CMS command properties
Steps:
1 Stop CMS
2 Append –trace at the end of the string in Command in Properties tab

Fig 02 - Appending Trace in CMS Properties
3 Restart the CMS
4 Now go to the location: Program Files\Business Objects\BusinessObjects Enterprise 11.5\Logging
and check the logs in the Logging folder.

Fig 03 – CMS logs in Logging Folder
BO XI 3.0 and Above: This option is applicable to the BO XI 3.0. Enabling trace through BO_trace.ini (This option is mostly usefulfor optimization or debugging purposes.)
Steps:
1 Stop the CMS
2 Locate file BO_trace.ini at this location C:\Program Files\Business Objects\BusinessObjects
Enterprise 12.0\Logging\logConfig
Note: A sample BO_trace.ini file can be found in the following locations after installing a build:
C:\Program Files\Business Objects\BusinessObjects Enterprise 12.0\Logging\logConfig\BO_trace.ini
To turn on tracing using the BO_trace.ini file, the "active" setting within the file must be set to "true" (i.e. active=true). And append -traceinipath to any server command line
Note: By default all the log files will be placed in \BusinessObjects Enterprise 12.0\logging folder
I hope this will be helpful to somebody.
Subscribe to:
Posts (Atom)
